Using AWS to deploy a Startup project: Part 2 - Backend
In the last chapter…
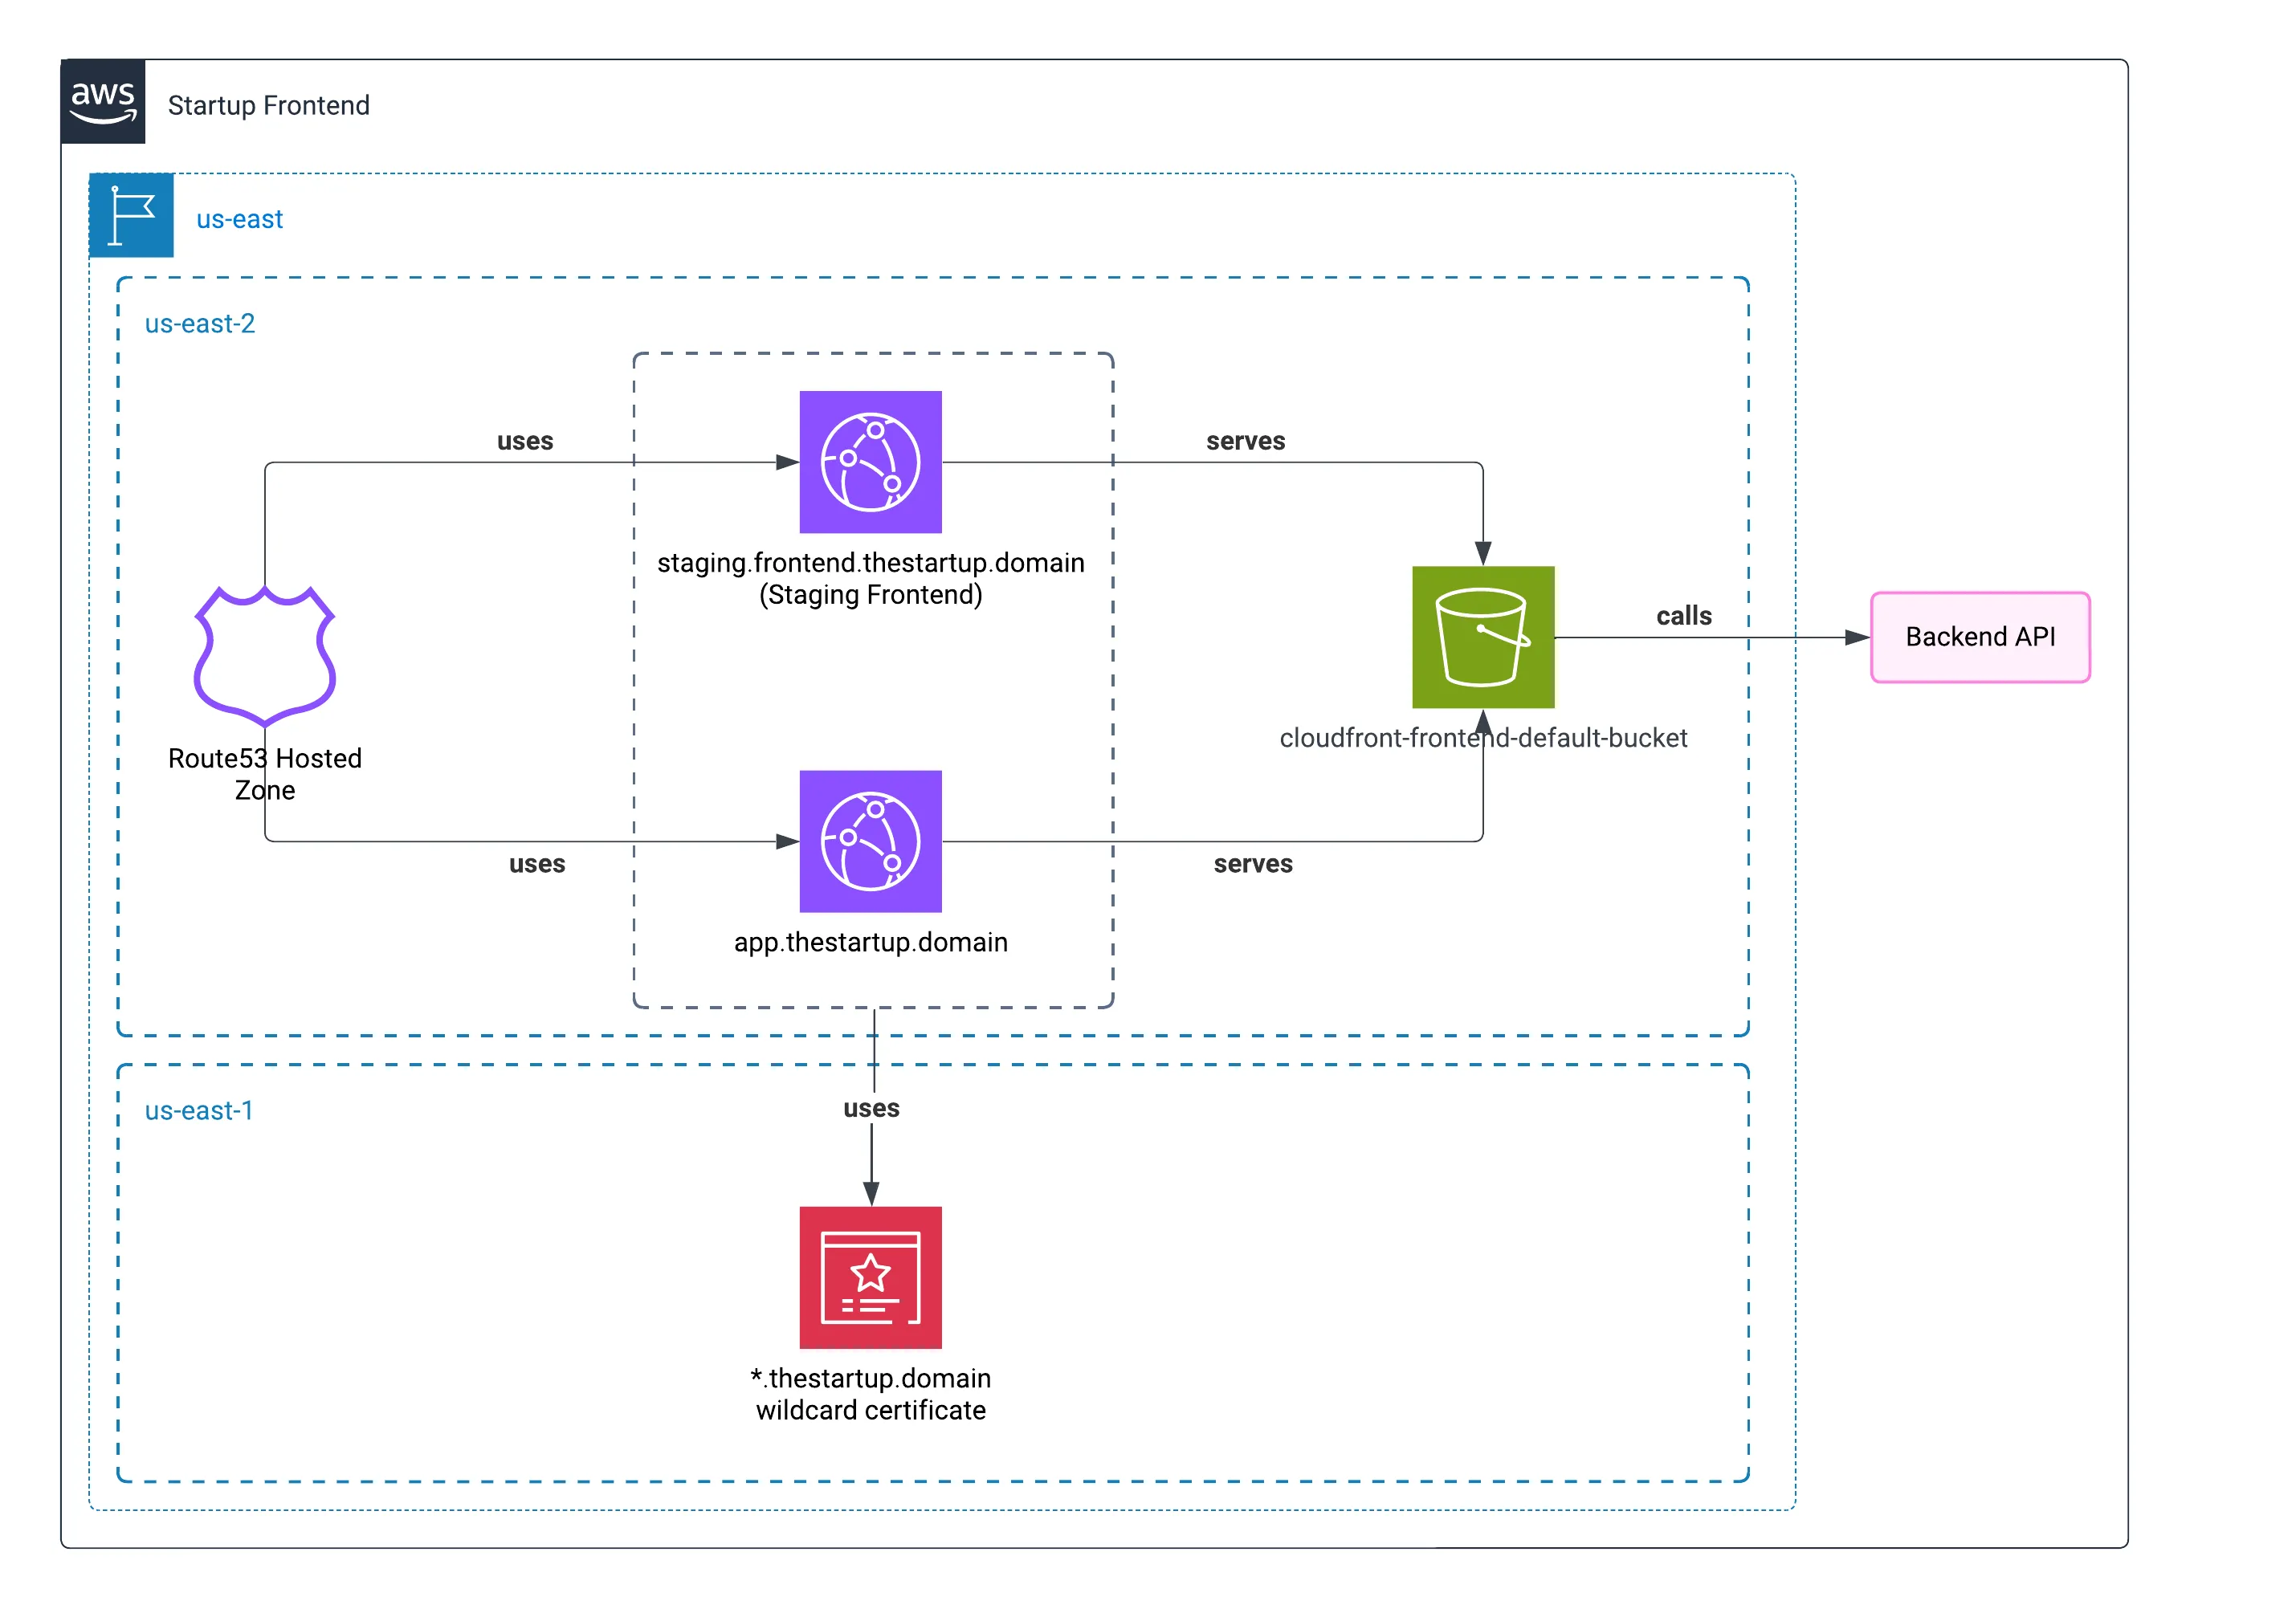
In the last post, I showed how the frontend of the startup was deployed. Taking advantage of serving static resources and utilizing a CDN, of course, it helped to have an available frontend experience.
Now I will explain the different resources of the backend, where most of the complexity resided.
Here is the full diagram of the backend.

Infrastructure as Code (IaC)
We used Terraform to build and deploy the different services across two different environments. We had a staging and a production environment, with variables stored in Terraform’s cloud service.
We encapsulated the code in different modules, as they could be reused across the architecture definition and because we needed to minimize changes between different environments.
Public subnet configuration
S3 buckets
We had two S3 buckets: one for storing user avatars and another for storing Application Load Balancer logs.
Similar to our approach in the previous chapter, we served user avatars through CloudFront—the fastest delivery method for our users. We configured the CDN specifically for the North American market where our application had its primary user base.

NAT Gateway
The NAT Gateway played a crucial role in our architecture by enabling containers in the private subnet to access the internet securely. Since our ECS Fargate containers needed to download NPM packages and Docker dependencies during deployment, the NAT Gateway provided this outbound internet connectivity while keeping the containers themselves inaccessible from the public internet.
As you probably know, we didn’t need an incoming direct connection to our containers. The NAT Gateway was placed in the public subnet and handled the translation of private IP addresses to public ones, effectively acting as a secure bridge between our private resources and the internet.

Application Load Balancers (ALB)
To redirect traffic from users to our containers, we had to use Application Load Balancers — a service from AWS that relies on Layer 7 of applications. We can set a group of rules once we create them, so it doesn’t matter which port we are serving our application on within the containers; ALB will handle all the traffic redirection, and also stick users to specific containers if we enable that option.

Network Load Balancers (NLB)
We had to expose our local PHPMyAdmin and Metabase instance to the private network, but since they lived within the same container group as our admin tool, we didn’t want to use an application load balancer. Instead, we needed an alternative way to share our applications on different ports compared to those typically used for web applications, and using the Network Load Balancer was the only solution.

VPN access
To allow internal workers to access our administration portal, we had to prepare a small EC2 instance with OpenVPN. Then, we manually created access for each worker. Since it was a startup, it didn’t matter if we had SAML or some other type of authentication, and the VPN worked fine to serve workers in North and South America.

ACM (Certificate Manager)
Finally, the Certificate Manager handled creating the certificate to serve our site over HTTPS. Nothing else to say, since it’s a must nowadays.
Private subnet configuration

ECS Fargate Cluster
We configured two different ECS clusters: one for each environment. Of course, for the containers living in staging, we gave them lower memory and CPU usage compared to the production ones.
When we created v1 of the product, we used ECS combined with EC2. Then Fargate came out with the promise of not managing servers anymore, and we gradually moved over the next two years.
Admin services
A regular web platform to check all the information related to users, their interactions, and to update any public data without requiring them to do it from the platform. It was hosted in ECS Fargate and served only through the VPN. This was served with the Application Load Balancer.
Private services
The private services included a couple of containers to serve some analytics using Metabase and a PHPMyAdmin tool for MySQL queries.
Monitoring
We always used CloudWatch combined with RDS graphs to measure how heavy the database usage was. CloudWatch was enough during the time that the project was running, and it was pretty cheap. What I missed compared to other logging tools was the ability to display colors according to the type of logs.
In later years, we used DataDog. In comparison, Datadog provides more tools to really summarize and visualize your logs and application health, at the cost of being more expensive financially.
RDS
In the first stage of the launch, we used AWS RDS for MySQL; however, over the years, and since Amazon launched different improvements to their services, we did a full migration to AWS Aurora Serverless for both environments. We never had big spikes coming from database reads, so a serverless database made sense at that time.
The serverless database was more than enough to support the different CRUD operations across the application. Since the application was mostly used from Monday to Friday, we had predictable usage, but response time wasn’t a priority.
Deployment

The deployment process wasn’t overly complex, but it did involve multiple steps: building Docker images with production-specific configurations and setting up AWS to deploy automatically when new Docker images were created.
First, we needed to pull the project code, build an ECR image, and deploy it to AWS.
name: Staging deployment
on:  push:    branches: [main]
jobs:  push_to_ecr:    name: Building and sending to ECR    runs-on: ubuntu-latest    steps:      - name: Checkout        uses: actions/checkout@v4      - name: Configure AWS credentials        uses: aws-actions/configure-aws-credentials@v4        with:          aws-access-key-id: ${{ secrets.AWS_ECR_GITHUB_ID }}          aws-secret-access-key: ${{ secrets.AWS_ECR_GITHUB_KEY }}          aws-region: us-east-2      - name: Login to Amazon ECR        id: login-ecr        uses: aws-actions/amazon-ecr-login@v2      - name: Build, tag, and push image to Amazon ECR        id: thestartup-admin        env:          ECR_REGISTRY: ${{ steps.login-ecr.outputs.registry }}          ECR_REPOSITORY: thestartup-container-admin          IMAGE_TAG: staging        run: |          printf '{"version":"%s"}' ${{ github.sha }} > src/version.json          docker build -t $ECR_REGISTRY/$ECR_REPOSITORY:$IMAGE_TAG -t $ECR_REGISTRY/$ECR_REPOSITORY:latest --target staging .          docker push $ECR_REGISTRY/$ECR_REPOSITORY:$IMAGE_TAG          docker push $ECR_REGISTRY/$ECR_REPOSITORY:latest          echo "::set-output name=image::$ECR_REGISTRY/$ECR_REPOSITORY:$IMAGE_TAG"
If you look at the filling of the src/version.json file, we used that to ensure that the current commit of the container was already deployed to ECS. The route was available as a health check in the container.
Additionally, we needed to trigger events once we made changes in AWS, and for that we leveraged CloudWatch Events.
After that, we used AWS CodePipeline, a service used to start different workflows to deploy your code in AWS services.
AWS CodePipeline handled several tasks: those related to detecting code changes, building the image (using CodeBuild), and then using CodeDeploy to push the code to all the containers.
Things that I will do nowadays
AWS limit access
All the developers were sharing many read and write accesses at that time, since it was easier to write and provide those kinds of accesses in AWS IAM. Today, I would limit each developer’s access only to the resources they really need, using roles if possible.
Feature Flags
When we launched different features, we changed the API and frontend pretty often. Since we were using Ionic to create the mobile version of the application, we sometimes had issues with users who were using an old version of the application and started seeing failures. The solution for that will always be using feature flags. With that, we can ensure that only users of the latest version of our applications will get the latest features. Or if we want to start a progressive rollout, we could just use 10% of our user base to test a new feature that we were preparing.

Triage
At the beginning, we didn’t have a proper system to handle and categorize incidents or bugs. When something went wrong in production, we would all jump to fix it without proper documentation or priority assessment. Today, I would implement a proper triage system where incidents are categorized based on their severity (P0, P1, P2, etc.), impact on users, and business implications.
This triage system would help us:
- Better allocate developer resources based on incident priority. We can count the top 5 errors, for example, and establish which developer from the team should be responsible for fixing them.
- Maintain proper documentation of production issues and create proper Incident Reports if possible.
- Create patterns to prevent similar incidents in the future.
- Establish clear communication channels and escalation paths when issues arise. We usually used Slack, directly triggered from each container, but if we use a Triage tool, that could be responsible for redirecting the errors.
Having a structured approach to incident management would have saved us time and reduced the stress of handling production issues, especially considering our containerized architecture across multiple environments.

For private services, maybe use an EC2 instance
Since serverless and containers are the norm within modern software development, I also think that sometimes it’s cheaper to keep running a regular small VPS. For example, when we were using EC2 to serve the VPN, compared to expensive VPN services that you can connect to your Amazon Network. Of course, we are talking about small companies.